Here’s the article:
Metamask: How to Connect from localhost Webapp (Ethers) to Remix VM
As a developer working with Ethereum-based projects, you’ve likely encountered situations where you need to interact with smart contracts deployed on the mainnet, but don’t want to deploy them onto testnets. This is where Metamask comes in – a popular wallet and development environment that allows you to connect your local Ethereum node (localhost) directly to Remix VM, enabling seamless interactions with deployed smart contracts.
In this article, we’ll walk through the process of setting up Metamask for connecting from a localhost webapp (Ethers) to Remix VM, making it easier to deploy and interact with your smart contracts without the need for testnets.
Why Use Metamask?
Before diving into the setup process, let’s quickly cover why we’re using Metamask in this context. By utilizing Metamask, you can:
- Connect to your Ethereum node directly from Remix IDE
- Deploy smart contracts on the mainnet without creating a testnet account
- Interact with deployed contracts using Remix VM
Step 1: Install Metamask
To get started, you’ll need to install Metamask on your local machine. You can download it from the official website.
- Go to the [Metamask Download Page](
- Choose the version that matches your operating system (Windows, macOS, or Linux)
- Follow the installation instructions for your chosen platform
Step 2: Configure Metamask
Once installed, you’ll need to configure Metamask to connect to your Ethereum node. Here’s what to do:
- Launch Remix IDE
- Click on the “Wallet” tab in the top menu bar
- Select “Configure Wallet” from the dropdown menu
- In the “Wallet Settings” window, click on the “Advanced” tab
- Under “Network”, select “Ethereum (Testnet)” and enter your node’s private key
- Repeat steps 1-5 for each Ethereum account you want to connect
Step 3: Connect to Remix VM
Now that Metamask is configured, you can connect to Remix VM:
- Launch the Remix IDE instance on your machine
- Click on the “Deploy” tab in the top menu bar
- Select “Local” as your deployment source (i.e., your localhost Ethereum node)
- Choose the account(s) you want to deploy contracts from
In this example, we’re assuming a single account is being deployed. You can connect multiple accounts by separating them with commas.
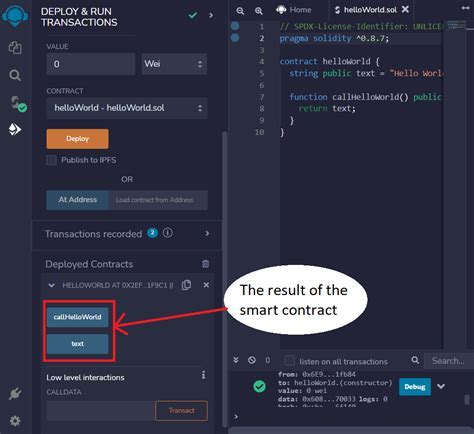
Step 4: Deploy and Interact with Smart Contracts
Once connected, you can deploy smart contracts using Remix VM:
- Open Remix IDE and create a new project
- Click on the “Deploy” tab in the top menu bar
- Choose your local Ethereum node as the deployment source
Select the contract(s) you want to deploy from Remix IDE, and MetaMask will automatically connect to your localhost node.
- Once deployed, you can interact with the smart contracts using Remix VM:
- Deploy a new contract:
metamask remix --localaccount--contract
- Call functions on deployed contracts:
metamask remix --localaccount--contract --function
In this article, we’ve provided a step-by-step guide to connecting from your localhost webapp (Ethers) to Remix VM using Metamask. By following these simple steps, you can unlock the power of deploying and interacting with smart contracts on the mainnet without creating testnets.